 I've been out of blogging for a while. Busy with work, baby, house, laundry etc....but I did have time to finish one of my flour sack decorative dish towels tonight while Harper played.
Showing posts with label DIY. Show all posts
Showing posts with label DIY. Show all posts
Monday, February 20, 2012
Flour Sack Towel
I've been out of blogging for a while. Busy with work, baby, house, laundry etc....but I did have time to finish one of my flour sack decorative dish towels tonight while Harper played. 
Sunday, January 15, 2012
Amelia's First Birthday

Harper got to attend her first birthday party ever yesterday! It was so fun! She came to celebrate her friend, Amelia's, first birthday. Amelia's mom told us she wanted to start collecting DVD's of favorite Disney movies for her. So, we decided to bring Amelia my personal favorite, Beauty and the Beast. I wanted to make Amelia a matching Beauty and the Beast bow, but I found every Disney ribbon but THAT one at Walmart. So, I went with her moms favorite, Nemo. I made four bows for Amelia and the were part of the decoration on the gift : )


Friday, December 30, 2011
More Bows!
I made two more bows for Harper. One I started a long time ago, it's a dog bow for her. She has a few outfits to wear it with. The other I just made tonight. I just liked the ribbons and was playing around with some different bow types.


Tuesday, December 6, 2011
New Bow for a Cute Outfit
I ordered a holiday outfit for Harper from my friend who created her own business, pink lime designs. The outfit turned out so cute! I LOVE the leopard antlers on Rudolph. Harper will be wearing this to our baby shower tomorrow at school. You see, because I had Harper so early, my third grade team at school didn't get a chance to throw the shower they were planning for me before Harper arrived. So, they decided to throw it once I went back to work. Now Harper gets to come too! Since she will be wearing this adorable outfit - I thought I'd make a bow to match it. I wanted to get to Hobby Lobby to buy some leopard ribbon, but I didn't make it there - so I just used the cream and tan ribbons I had on hand with some red and black gross grain. I think it turned out pretty cute.

Tuesday, November 29, 2011
Little Girl Christmas Stocking
Tonight I finally finished Harper's Christmas stocking! I chose a red quilted fabric for the main portion of the stocking. The inside is a tan material - I originally wanted to use burlap, but I thought this would be easier to work with. I then added a little ruffle with the fun green, red and pink snowflake fabric. And lastly, I added the fun green ball strip as a cute detail. I think it turned out pretty well. I wanted to make a heel and toe with the snowflake fabric, but my sewing machine wasn't really cooperating on that one, so I skipped it. Next year I may remake my stocking and Will's as well...but I won't have time to do that this year!


Sunday, November 27, 2011
A Christmas Style Boutique Bow

I've ordered a few bows for Harper off Etsy, but I've really wanted to learn how to make boutique style bows. So I found this blog - she has videos on You Tube on how to make all different kinds of bows. For my first boutique bow I tried I used pinks, greens and reds to make a Christmas bow for Harper. I think it turned out well for my first one of this kind! Anyway - check out her blog and videos on You Tube to learn how to make these bows. They are pretty easy!
Wednesday, November 9, 2011
Samson's New Christmas Stocking
I wanted to make Samson his own stocking. Last year I tried to find a dog stocking I liked, but they were all cheesy. So I found my inspiration here. I decided to use felt instead of fake fur for my outer part of the stocking. On the inside I picked a fabric that had a burlap look to it but was more of a thinner canvas.

 Finished product!


 Finished product!

Friday, September 23, 2011
Easy Fall Decor


 I wanted to do something rustic but fun looking for one of my glass jars on our media stand in the family room. I saw these two ideas on Pinterest and it sparked an idea for my simple (just had a baby 3 weeks ago) version.
 Layer Studio
 The Wedding Bee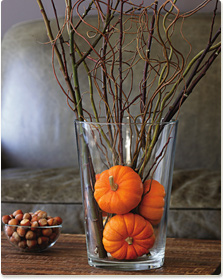
I had some old sticks/twigs in my basement that I was going to use for another project. So I grabbed four, picked up a bottle of golden color spray paint at Walmart and lightly spray painted the sticks. I left some of the original twig color showing just to keep it looking a little more rustic. I put some faux pumpkins and leaves in the bottom of the jar and popped the twigs in!
Sunday, September 4, 2011
Auburn Newborn Tutu
In honor of yesterdays Auburn win, I decided to start making Harper's Auburn tutu. I had bought the tulle a while back and just had not gotten around to starting it yet. I followed this tutorial. It was pretty easy and only took me about an hour and a half. Harper will now be ready for all the game days this football season (whenever she decides to maker her debut) and also she will wear this for when my friend Katie does Harper's photo shoot after she is first born.


Saturday, September 3, 2011
Easy Keepsake and Nursery Decor
A lot of people tell me, "you're so creative" but really I just steal my ideas from places like Etsy, blogs, Pinterest and other creative friends - like my friend Katie McCaw. I had seen a fun project Katie had done with cards from her wedding and wedding shower...and it hangs in her condo now. It was a super cute idea. So, I asked her if I could steal her heart cutter to do the same with cards I had gotten from baby gifts for Harper. My version of this fun keepsake craft is below - or you can check out Katie's version here. It was pretty easy and now it's fun to look at and think about all the generous friends we have that have already helped to spoil Harper.


Sunday, August 28, 2011
Christmas Keepsake
Do you have keepsakes that you never look at because they are in a box somewhere?
I know I do. My wedding invitation, graduation announcements and most recently - Harper's baby shower invitation. Somewhere I saw this idea - I thought I had saved the link on my Pinterest, but I didn't. So, if I am stealing this from you, I'm sorry - it is not intentional. This is so super easy to do and then you get to see your keepsake once a year - instead of never because it is in a box somewhere.
Buy some plain clear ornaments from Hobby Lobby. Shred your keepsake in a shredder. Curl the pieces like you would curling ribbon. Drop them in the ornament. Add some coordinating ribbon...and...it's done!

Tuesday, August 23, 2011
Ruffle Butt Onsie
I attempted my first "ruffle butt onsie" tonight. I think it turned out pretty cute - definitely not perfect, but good for my first try. My ruffles got a little uneven on one side. The writing says "I heart Samson". The fabric is black with little white dog bones. I got some cute ribbon to match to make a bow, but didn't get that far tonight.

Monday, August 22, 2011
Free Paint Swatch Bookmarks
For all you teachers out there - you'll love this idea I found on Pinterest. They are bookmarks you can make from paint swatches - free paint swatches! I quickly put these together and gave them to my kids for the first day of school. I just got some swatches from Walmart - cut a few in half and glued a strip down the middle of one I hadn't cut. Then, I laminated them. Once they were laminated, I hole punched a hole and tied some ribbon in the top. The only thing I paid for was the ribbon. They turned out cute and the kids loved them.

Tuesday, August 2, 2011
Classroom Giving Tree
I'm a teacher when it is not summer time. So, Sunday I crafted a little something for my classroom. I'm always looking for donations of different supplies - Ziploc bags, Lysol wipes, GermX... just stuff that you need for your classroom - stuff that adds up if you purchase it all yourself all the time. So, I made a Giving Tree! This Giving Tree will sit out at Meet the Teacher Night, Curriculum Night and at Fall and Spring Conferences. Parents are always asking me if I need stuff - so I thought why not present it in a cute and *optional* way.
I made the base out of some scrap wood...I tried to nail it around the little twig, but I didn't have nails that were long enough...so out came the hot glue.


I wrapped the base in some quilting filler to cover all the splinters from the scrap wood.

Then I wrapped the base in some pretty, green, scrap fabric I had.

I made a little sign for my Giving Tree just so the parents knew it was optional.

I made little leaves that hang from green ribbon.

My finished Giving Tree. I think it's so cute!

Sunday, July 24, 2011
Bird Room Wall Project
So Harper's room kind of has a theme - it's birdies. I fell in love with the Penelope birdie bedding from Pottery Barn Kids when my friend Megan was pregnant and I was in the store buying part of her crib bedding. I always said, if I get pregnant and have a girl and they still have this bedding then I am buying it for my baby girl.
Well, I did get pregnant...and found out I was having a girl...so, naturally I registered for the birdie bedding. I just love it. It's girlie, but not super girlie. We have tried to do a lot of things in the room in greens too, so if our next child is a boy - I can do the dino themed room I have always dreamed of for a little boy.
Awhile ago I had seen this artwork that someone had done on some website (probably Etsy) that went along with the Pottery Barn Kids Penelope bedding. Well, I decided to make my own. I needed something to go above the changing table. So last night, after we hung Harper's curtains and sheers, I was standing in the room staring at the blank walls. I'd been picking up lots of little things for the walls in the last few months that I thought would match. I was walking around holding things up on different walls and trying to decide where to put what. That was when I remembered the birdie art.
So today I ventured out, bought two pretty basic espresso frames and purchased an assortment of scrap paper from Michaels. Then tonight - I got to work - I crafted some pretty simple birdie art for above Harper's changing table. Will worked hard on hanging some things I had already purchased on the walls. Now, I have only two walls, I mean, projects left.


Well, I did get pregnant...and found out I was having a girl...so, naturally I registered for the birdie bedding. I just love it. It's girlie, but not super girlie. We have tried to do a lot of things in the room in greens too, so if our next child is a boy - I can do the dino themed room I have always dreamed of for a little boy.
Awhile ago I had seen this artwork that someone had done on some website (probably Etsy) that went along with the Pottery Barn Kids Penelope bedding. Well, I decided to make my own. I needed something to go above the changing table. So last night, after we hung Harper's curtains and sheers, I was standing in the room staring at the blank walls. I'd been picking up lots of little things for the walls in the last few months that I thought would match. I was walking around holding things up on different walls and trying to decide where to put what. That was when I remembered the birdie art.
So today I ventured out, bought two pretty basic espresso frames and purchased an assortment of scrap paper from Michaels. Then tonight - I got to work - I crafted some pretty simple birdie art for above Harper's changing table. Will worked hard on hanging some things I had already purchased on the walls. Now, I have only two walls, I mean, projects left.
Sneak peak of part of Harper's room...I'll post lots of pictures when the whole thing is done.
Tuesday, July 12, 2011
Corker Bow
I decided to try and make a corker bow when I saw this tutorial. I wanted to make an Auburn bow for Harper, since she will be arriving in the heart of football season. I decided on some navy gross grain ribbon, orange with white polka dots gross grain ribbon and some white satin ribbon with brown footballs on them. I wrapped the ribbon around some skinny wooden dowels I bought at Hobby Lobby and put clothespins on each end. Next, just bake in the oven at 275 for 25 minutes! When they are cooled and you take the ribbon off the dowel - it will keep its korker shape!

Next, I made three individual corkers by cutting the ribbon into smaller pieces. I wrapped jewelry wire around the center to hold the bows in place.
 Then I just hot glued them on an alligator clip to make a fuller and larger bow and topped it with an orange button!


Next, I made three individual corkers by cutting the ribbon into smaller pieces. I wrapped jewelry wire around the center to hold the bows in place.
Then I just hot glued them on an alligator clip to make a fuller and larger bow and topped it with an orange button!
Here is a view of the corker bow clipped on an orange headband. All ready for Ms. Harper to wear!

Monday, July 11, 2011
Three Layer Bow
I made this bow a few weeks ago and just got around to finishing it tonight by putting the clip on it. This bow is called a three layer bow because it is basically three bows put together to make one larger bow. You make the three individual bows first and then stack them on top of each other. It gets finished by hot gluing the "knot" piece around the center. I forgot to take pictures along the way, but you can find the tutorial I followed here.


Subscribe to:
Posts (Atom)